●●●● https://forum.xda-developers.com/galaxy-tab-10-1/general/stable-7-1-setup-google-voice-bigger-t3768344https://forum.xda-developers.com/galaxy-tab-10-1/general/stable-7-1-setup-google-voice-bigger-t3768344http://yulyion.blogspot.com/2018/01/101-wifi-shw-m380w-aosp-6071.htmlhttpsroxyReferer=http%3A%2F%2Fwww.google.com%2Furl%3Fsa%3Dt%26rct%3Dj%26q%3D%26esrc%3Ds%26source%3Dweb%26cd%3D4%26ved%3D2ahUKEwj4l-GI2vXnahUbI6YKHZKAD2SJADQ%25DHADJAD%3DHB%26%3DHBUL%26AB%26
Galaxy Tab 10.1 (Galaxy Tab 10.1) released around 2011 has an older Android operating system (3.0 honeycomb) installed, so you can’t install the app and the Play store doesn’t work. The performance is not good, but I rarely use it, and I thought it could be used only for web surfing and watching videos, so I looked into how to upgrade Android OS and found out that some experienced people left comments.I will upgrade my Android OS to 7.1 version, and I will summarize it below so that anyone can copy it.The model name of Galaxy Tab 10.1 is different from the domestic and international version.* Model name 3G version: SHW-M380S/K (domestic) / P7500 or P4 (overseas) WIFI version: SHW-M380W (domestic) / P7510 or P4 WIFI (overseas) Can you charge Galaxy Tab 10.1 that has been left unattended for a long time?After connecting to the charger for a few days, the battery can be charged at some point. (laughs) 1. First, you need a computer (PC) with Windows 10 or 7 operating system.Must be Windows and not Apple MacBooks with MacOS installed.Please download the files needed for this task from your PC from the link below.I have written both the link I got directly and the file link I put on my Google Drive.Generally, Google Drive Links are much faster.(1)Samsung Odin Program (latest version 3.14.1) The Samsung Odin Program is a program developed by Samsung that changes the firmware of a mobile phone that runs on Windows. Used to install genuine Samsung roms (firmware) and custom recovery images (e.g., TWRP, CWM, etc.). File Name: Odin3_v3.14.1.zip Approximately 2MBhtps://odindownload.com/ Attachments Download Odin3_v3.14.1.zip File
Galaxy Tab 10.1 (Galaxy Tab 10.1) released around 2011 has an older Android operating system (3.0 honeycomb) installed, so you can’t install the app and the Play store doesn’t work. The performance is not good, but I rarely use it, and I thought it could be used only for web surfing and watching videos, so I looked into how to upgrade Android OS and found out that some experienced people left comments.I will upgrade my Android OS to 7.1 version, and I will summarize it below so that anyone can copy it.The model name of Galaxy Tab 10.1 is different from the domestic and international version.* Model name 3G version: SHW-M380S/K (domestic) / P7500 or P4 (overseas) WIFI version: SHW-M380W (domestic) / P7510 or P4 WIFI (overseas) Can you charge Galaxy Tab 10.1 that has been left unattended for a long time?After connecting to the charger for a few days, the battery can be charged at some point. (laughs) 1. First, you need a computer (PC) with Windows 10 or 7 operating system.Must be Windows and not Apple MacBooks with MacOS installed.Please download the files needed for this task from your PC from the link below.I have written both the link I got directly and the file link I put on my Google Drive.Generally, Google Drive Links are much faster.(1)Samsung Odin Program (latest version 3.14.1) The Samsung Odin Program is a program developed by Samsung that changes the firmware of a mobile phone that runs on Windows. Used to install genuine Samsung roms (firmware) and custom recovery images (e.g., TWRP, CWM, etc.). File Name: Odin3_v3.14.1.zip Approximately 2MBhtps://odindownload.com/ Attachments Download Odin3_v3.14.1.zip File

Photo Source: https://liverex.net/1058
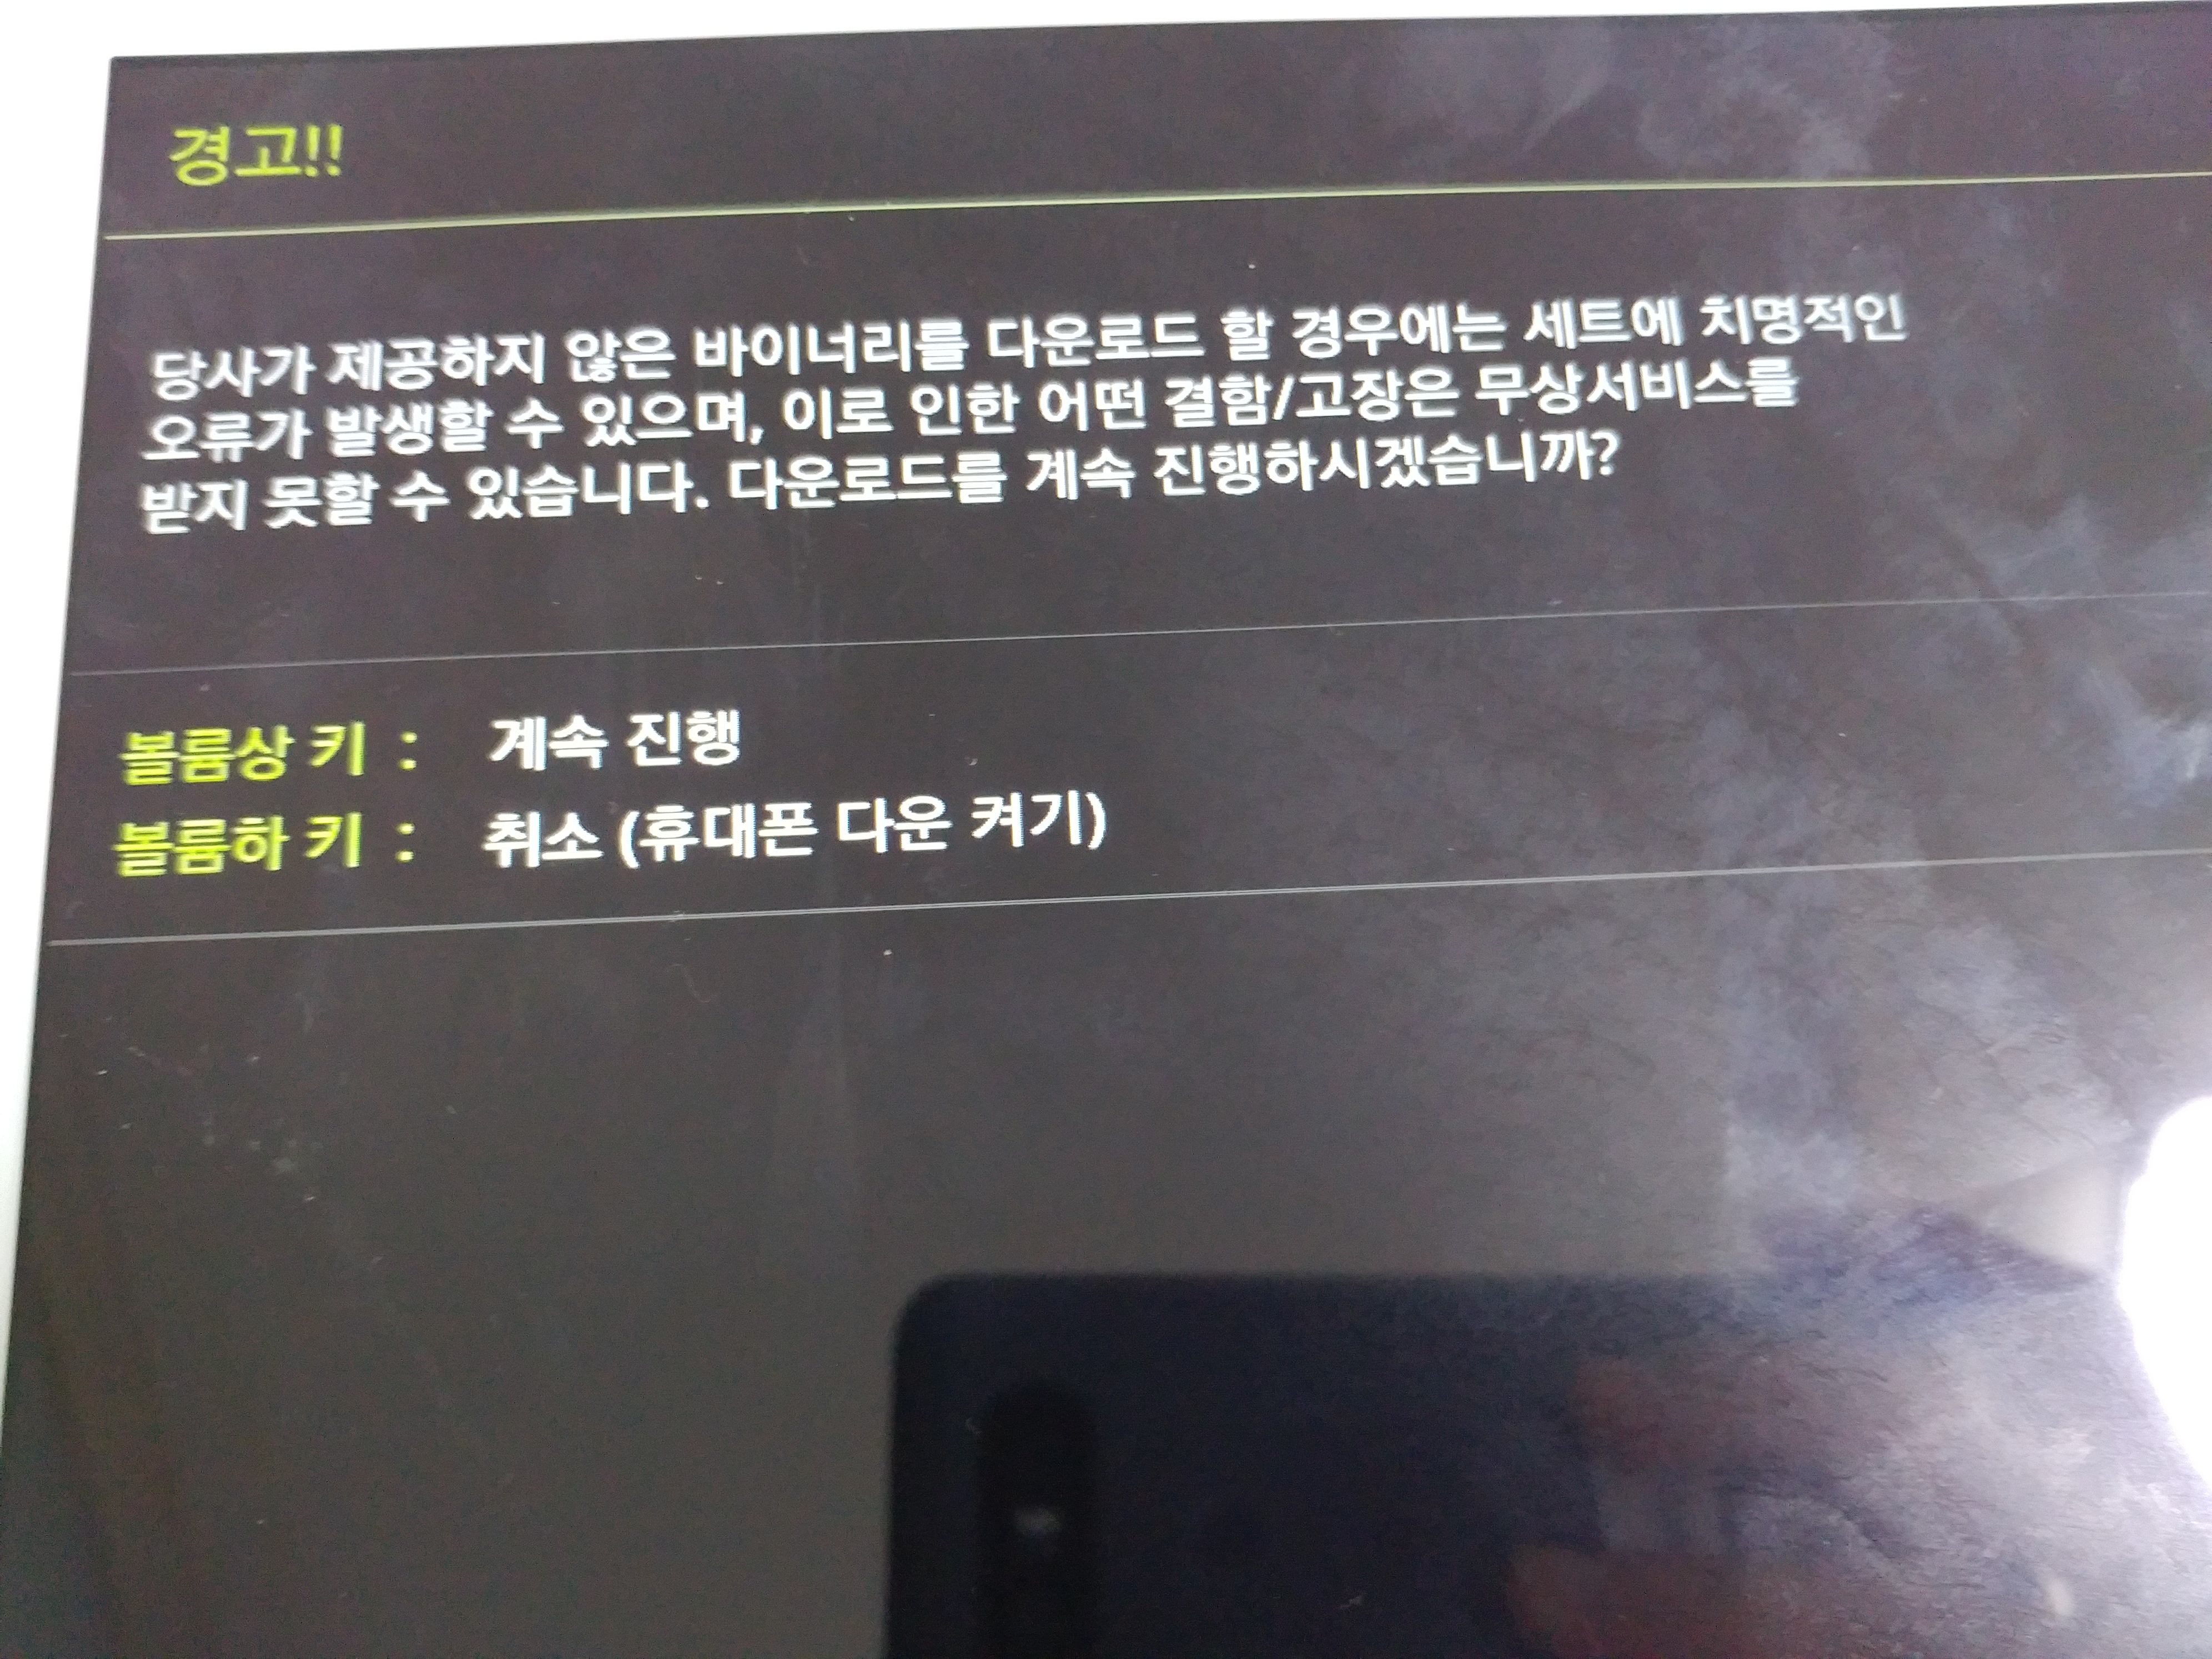
If you press the ‘Power Button’ and ‘Volume Down Button’ at the same time for more than 10 seconds without turning off the Galaxy Tab (completely) and connecting to the computer, you will see the Android Robot(?) screen as shown below.(Press and hold until the bottom screen appears.)
the image above two selected from a menu screen.there is an image of the following box is performed according to the ” recovery mode (Recovery Cassidy ) ” the Android Robots only of the right is performed according to the ” a download mode (D de Town Circle mode) “.On the screen, and in menu by a transfer function, a ” volume up button “, feature executed.現在”ダウンロードモード”が選択されているので、これを実行するために”ボリュームアップボタン”を一度押すと下の画面に変わります。

Press the Volume Up button again. This will run Odin 3 download mode as follows:
Press the Volume Up button again. This will run Odin 3 download mode as follows:

First, if you run Odin 3, you’ll see the following:

the middle five at the sight buttons. 順番に見ると、[BL]はブートローダーファームウェアファイル記録時に使用し、[AP]はファームウェアをアップロードする時に主に使用しますが、1つのtar.md5さえあればAPでFlashします。 [ C P ] relating to the modem [ CSC ], it includes Microsoft launched its first mobile consumer more Microsoft datatypes Howard but ” oke ” stands for, It, To Provide Customized version in LTE necessary when patch. Odin, Gal’s tabs are connected by a PC cable after executing a lower screen of the left < ID : / 5 > A log!!! I receive.
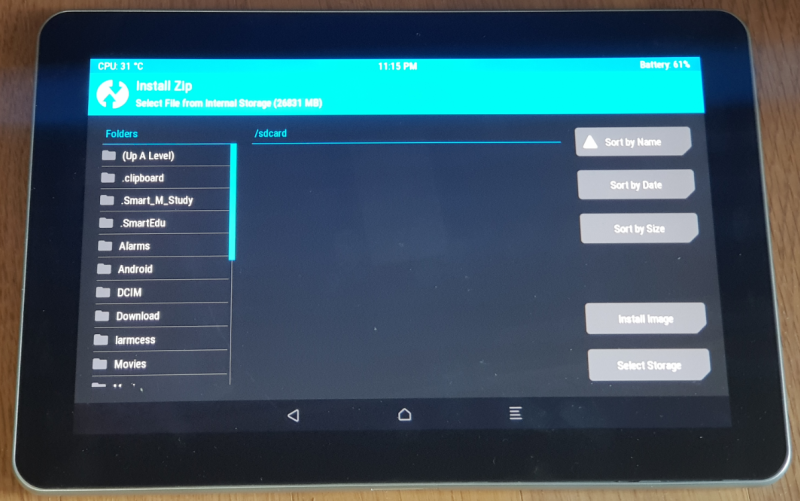
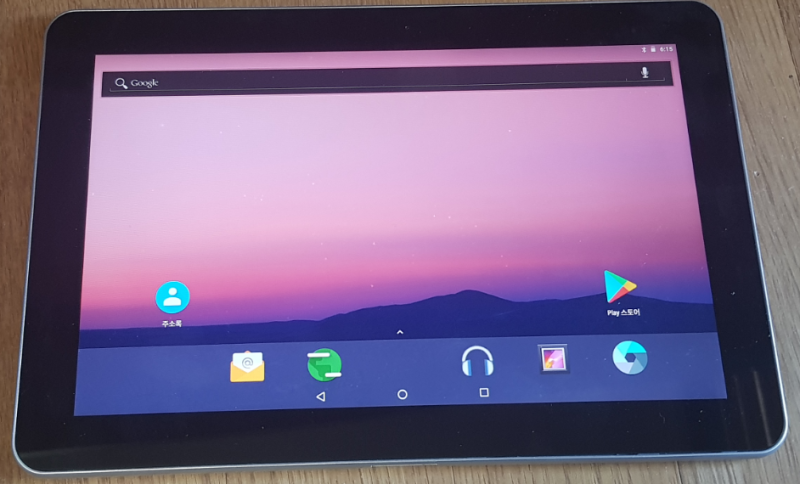
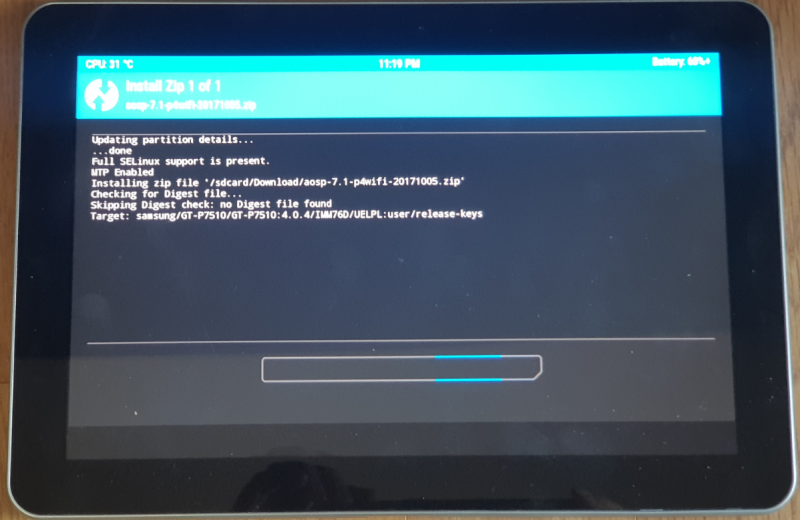
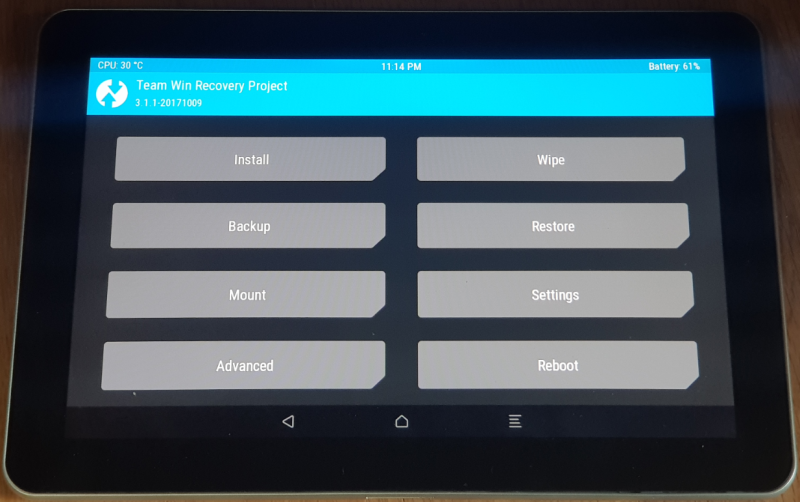
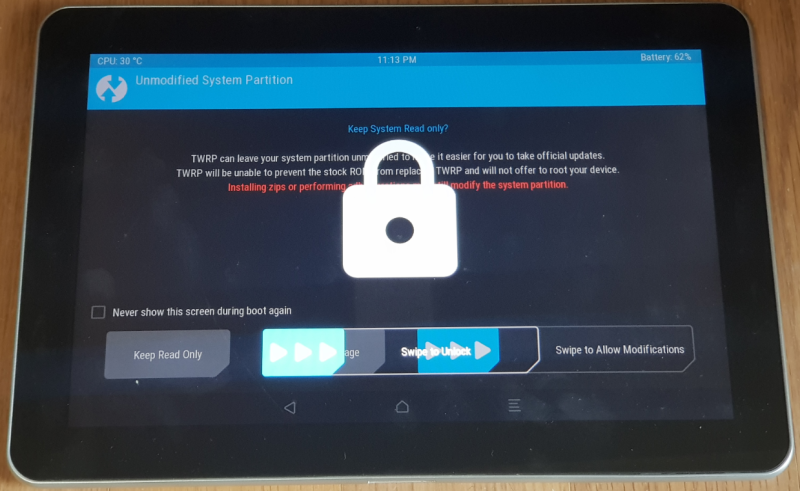
Click the AP button to extract the P7510XEULPH_P7510XXLPH_HOME.tar.md5 file, which is the genuine overseas rom file. capacity of approximately 600 Mbytes). This will load the genuine rom as follows:Click the Start button at the bottom of Odin 3 to make a genuine rom copy, with the letters APP in the upper left corner and the progress in the bottom corner as shown below.The progress screen is as follows.After completing this process, PASS! appears as follows:3. in the Galaxy Tab 10.1. WR (Samsung should be used for Odin ) to install an extra 3.1.1 RP to install a custom image of a recovery from TW this time Let’s take a look. ROM is installed, free from all overseas after restart the SA (root mean square) United Nations logo on the screen flickered only for a possibility. TW RP is installed, please. To install the TWRT and are resolved, however, genuine foreign countries of the ROM 「 the Galaxy Tab 10.1. they have installed advanced in the same way you need to be executed by the downloading 」.I will write the same procedure above, it is easily. Galaxy Tab is turned off after a volume down button right to the side of the power supply button 」 「 「 」 at the same time, continuously presses for more than 10 seconds and Android robot Odin when it’s on the screen 3 by performing a download mode, please. In other words, the volume up button 」 「 「 once pushed, and after there was a warning screen, one more volume up button 」 and press Enter. It was a download mode is executed by the Galaxy Tab with this. Galaxy Tab 10.1. with a personal computer via a USB cable is connected to me cite should be good to go.Hopefully this Windows Run the Odin a computer 3.Click the AP button located in the middle and select the twrp311-20171009-p4 wifi.tar.md5 file (about 20 Mbyte). This will load as follows:Click the Start button at the bottom of Odin 3 to make a TWRP copy.After completing this process, PASS! appears as follows:to initialize Plant, Something that caters to the initialization to cut down on errors with plant is said to be.Galaxy Tab for initializing a factory. need to be executed in recovery mode (Available at mode Mayfield Partners ) P is installed in September 2004 WR related program is installed in the Galaxy Tab 10.1. the recovery mode.TW of the custom in step three recovery image RP is installed, factories, initialization is easy., here’s how Lima works : 3 Exactly the same as a process executed by the downloading 」 「 they before. In other words, after the Galaxy Tab is turned off a volume down button immediately adjacent to the power supply button 」 「 「 」 pushed for 10 seconds or longer and any one time.a The following screen is displayed.An icon is TW (Low Bit Recording) mode, as a benchmark in battle in the icon mode is displayed to download the right.lower button icon is on and off the left, depressed, 」 「 volume. Now, volume up button 「 」 is pressed, the recovery mode is executed (if TW (3) 1 The recovery mode does not operate normally by installing the NetBeans Mobility Pack for WR, 8 and 7 version installed, please).”When I swipe “”Swipe to Unlock”” on the screen, I see a screen similar to the one below.””When I swipe “”Swipe to Unlock”” on the screen, I see a screen similar to the one below.”The right at the top of the factory is a Wipee initialized.after a Wipee touch and swiping and the factory should be initialized ” Juniper ” Froyo Factor , Reviews will likely copy Swype / Password : “.After the initialization is finished, ” Re Shlomo that have outlived their usefulness, or boot ” restart by clicking a button.much like Samsung logo on the Island of Spice were displayed on a screen, wait until one or two minutes for Telcom and language selection picture appears. “韓国語”を選択した後、”次へ”をタッチします。out should be the date and time is set from here on out. GMT, 9:00 + and set in Seoul.Google account will be set down me, tell later. GPS設定は「次へ」で、タブレット所有者には名前を書いてくれるグーグルサービスで「次へ」を押していただければ完了します。no factories in the process of the initialization of now. (5) Galaxy tab in the AOS PPS. 1, GA (PPS), SU, we need to copy files.(1)aosp-7.1-p4wifi-20171005.zip(2)SuperSU-v2.82-201705271822.zip(3)open_gapps-arm-7.1-pico-2020229.zip上の3番Open_gappsファイルは、以下のリンクから探してダウンロードできます。Open Garden Apple (8 – By on Windows from cyprinodont is provided, the less Source SourceForge. net or Platform, access to the following websites : ARM, an Android version 7. 1, Picplz : Reader’s is selected and available for download.The Great Apps Open Pro Project the Galaxy Tab running in recovery mode following screen is displayed, (See above ) after cable is connected to a computer.(Galaxy Tab 10.1 computer connection of a USB memory built-in memory To use. )You will now be asked to select an installation file.If you go into the Download folder, you can see the file you just copied.Select the aosp-7.1-p4 wifi-20171005.zip file that you copied to the Download folder.(The screen capture was done before SuperSU was known, so only two files can be seen on the bottom screen. If you copy it the same way from the beginning, you should see three files.Then the Swipe to confirm Flash button appears, and the installation starts when you swipe it.!! WARNING!! You can see Rebootafter Installation is complete on the right, but do not enable it. The installation lasts approximately five minutes.When the installation is complete, ask if you want to reboot as follows: Never reboot at this time!Then, not Super S in a state to restart soon install. . the Galaxy Tab 10.1. Supermarket SUV 2. To install, you need to be conducted in a state of not starting again.A OSP Once this is done, and then clicking a button ” With a BNO (British Apache / Dalvik “.The youngest one of the three buttons you click the button in the form of the house of the center this as a menu.Institute one more Super, click the SUV – (2) 8 – 170 52 7 1822. zip file is selected and install.It won’t take a minute in the establishment. I’m going to restart now tap the buttons ” Re Shlomo that have outlived their usefulness, or boot “. Since then, a swipe to ensure be resolved, you can start again.Then, not Super S in a state to restart soon install. . the Galaxy Tab 10.1. Supermarket SUV 2. To install, you need to be conducted in a state of not starting again.A OSP Once this is done, and then clicking a button ” With a BNO (British Apache / Dalvik “.The youngest one of the three buttons you click the button in the form of the house of the center this as a menu.Institute one more Super, click the SUV – (2) 8 – 170 52 7 1822. zip file is selected and install.It won’t take a minute in the establishment. I’m going to restart now tap the buttons ” Re Shlomo that have outlived their usefulness, or boot “. Since then, a swipe to ensure be resolved, you can start again.At this point, not must be restarted, and also had restarted after the Apple installed lprps from the ongoing for some veterans is not certain whether not to be.In conclusion, and this must start again.참 고 : https : / / form.) on data – Development Partners. com / Galaxy – – 10 – 1 used by genkernel / – 7 – 1 – setup – Google – a voice-over-IP/voice-over-data – big – 376 8 4if it restarts in advance, it’s called Android and character in the starting image displayed for a while.(It is five minutes ), fully, when booting system is locked to enter into a recovery mode after waiting for some time to install the Google Apps. , As Galaxy Tab 10. 1 the incorporation of the Open of the old model to installing Apps To install the entry of the recovery of.Open required reading !!! Great Apps can not make use of the old version no other way using a good harvest. xx old version of file name 75 – apps – – – -. zip. You need to use this file is obtained on the Internet. It’s on the preparations, but this advance I’ll let you know the link again.https://forum.xda-developers.com/devdb/project/dl/?id=13550 ギャラクシータブをリカバリーモードで実行します。 (ギャラクシータブをオフにした後、’電源ボタン’と’すぐ隣にあるボリュームダウンボタン’を同時に10秒以上押し続けます。 以後、アンドロイドロボットの絵が出たら「ボリュームダウンボタン」を一度押して、左アイコンが点滅したら「ボリュームアップボタン」を押せばリカバリーモード作動!)TWRPモードが実行されれば「Swipe to Unlock」をスワイプしてくれます。その後、Installボタンを押すと、インストールファイルを選択するように表示されます。Downloadフォルダにコピーしておいたp75xx-gapps-L-7-17-15.zipファイルを選択します。この時、もしDownloadフォルダにp75xx-gapps-L-7-17-15.zipファイルが消えたら、5番目のステップを参考にしてコピーしてください。 (リカバリーモード上でPCとケーブル接続した後、ファイルコピーしてください)たまにOpenGAppsインストールファイルが消える場合がありますが、どのような場合に消えるのか原因を正確に把握できませんでした。 すぐコピーされるので心配しなくても大丈夫です。これで約3分間にわたって設置が行われます。 インストールが完了したら、再起動するかどうかを尋ねます。 再起動してくれます。 今回は起動速度がはるかに速くなければなりません。If you restart first, the character Android appears briefly on the startup screen.(Approximately 5 minutes) When fully booted, wait for the system to lock, then enter recovery mode to install Gapps 8. Install Open Gapps on Galaxy Tab 10.1, and install older Gapps in recovery mode.Must read!!! Open Gapps must be older than the latest version. The older version of the file is named p75xx-gapps-L-7-17-15.zip. You must obtain and use this file on the Internet. It’s in the preliminary preparation, but I’ll give you the link here again.https://forum.xda-developers.com/devdb/project/dl/?id=13550 ギャラクシータブをリカバリーモードで実行します。 (ギャラクシータブをオフにした後、’電源ボタン’と’すぐ隣にあるボリュームダウンボタン’を同時に10秒以上押し続けます。 以後、アンドロイドロボットの絵が出たら「ボリュームダウンボタン」を一度押して、左アイコンが点滅したら「ボリュームアップボタン」を押せばリカバリーモード作動!)TWRPモードが実行されれば「Swipe to Unlock」をスワイプしてくれます。その後、Installボタンを押すと、インストールファイルを選択するように表示されます。Downloadフォルダにコピーしておいたp75xx-gapps-L-7-17-15.Select the zip file. If the p75xx-gapps-L-7-17-15.zip file disappears in the Download folder, refer to the fifth step to copy it. Sometimes OpenGApps installation file disappears, but don’t worry about when it disappears. This reboot will take about 3 minutes.3C All-in-One Toolbox manage 33When the Management screen appears as shown above, enter the CPU settings at the bottom left. Then, a screen similar to the one below appears.3C All-in-One Toolbox CPU Settings ScreenI have written on both sides in the middle of the image above 1 GHz and running for the first time but (1) and you should see the first computer 100 GHz. by increasing operation speed + display by pushing 1 GHz, please. And, just above the private sector in for man and written part is to be first executed, International when (a) Interactive, ” It is written. This is touched, (e) When the menu has popped up for the PerformanceReleaseconfiguration is selected, please. (up to 400 MHz CPU speed (set at 1 GHz), that’s all. looks you’ll be faster than this stability.Cover the CPU (control Perfect Form Search Partners the technology), you should be set in ; ) = > set in this way you can feel it happened much faster. 1. the Galaxy Tab 10.1 one upgraded to Android to the 7th and 14th of success, this upgrade was successful, you’ll see as follows.METHOD FOR CHANGING 11. a connection mode USB (PC – Galaxy This (b) ) of Galaxy, upgraded with the Android 7. 1 of the MySpace and a PC when connected to one of the three of the charging mode and a file transfer mode and a photograph of a transfer mode connected to. charging mode from the PC when connected a USB Tab in the files of the Galaxy do not. At this time, changed into a file transfer mode, please. (PC connected to the imported by files captured by a file transfer mode), after USB connection, if you swipe upward and downward through the upper right corner, is as follows will be displayed.The phrase “Charge this device with USB” or “USB for file transfer” appears, but when you touch it again, it appears as follows, and you can select USB connection mode here.●●●●https://forum.xda-developers.com/galaxy-tab-10-1/general/stable-7-1-setup-google-voice-bigger-t3768344https://forum.xda-developers.com/galaxy-tab-10-1/general/stable-7-1-setup-google-voice-bigger-t3768344http://yulyion.blogspot.com/2018/01/101-wifi-shw-m380w-aosp-6071.htmlhttpsroxyReferer=http%3A%2F%2Fwww.google.com%2Furl%3Fsa%3Dt%26rct%3Dj%26q%3D%26esrc%3Ds%26source%3Dweb%26cd%3D4%26ved%3D2ahUKEwj4l-GI2vXnahUbI6YKHZKAD2SJADQ%25DHADHADJAD%3DHB%26%3DHBUL%26AB%26